One thing that WooCommerce stores typically fret over is pricing, and your strategy is a critical factor in whether you keep the lights on or not. For instance, a static pricing strategy can often leave money on the table and fail to account for the nuanced ways different customer segments might value your products. Dymanic pricing is much more adaptable, albeit tougher to implement without the right plugin.
Using Flex Pricing, you can implement dynamic pricing in a snap. In this post, I’m going to show you how to use its flexible pricing rules to build some dynamic pricing setups across a number of different store types!
Understanding What Makes Flex Pricing Different
Before I get into the implementation though, let me take a few words to explain what sets Flex Pricing apart. Rather than another discount plugin, this uses a sophisticated pricing engine that leverages Artificial Intelligence (AI) to help you make real-time decisions. This can use customer attributes, location, and behavior, and more.

This enables you to implement user-level dynamic pricing, something that isn’t typically available for many WooCommerce stores. Whether you run a small boutique or manage multiple stores across the globe, you can now implement the same kind of sophisticated pricing strategies used by major retailers.
I talk about Flex Pricing in more detail over in the dedicated review—so check that out, then come back and run through the setup with me.
Getting Started With Your Store Setup
The review covers the basic installation, so let’s focus on optimizing your initial configuration. Once you install the plugin, you’ll need to complete several crucial setup steps. First, navigate to Settings > Flex Pricing in your WordPress dashboard to enter your API credentials.

Next, head to the Products section of your Flex Pricing dashboard. Here, you’ll need to verify your product catalog has synced correctly. This will be a simple scan of the list to compare the number of products between Flex Pricing and WooCommerce.
This initial setup lays the groundwork for your future dynamic pricing strategies. While it might seem tempting to jump straight into creating pricing rules, investing time in proper configuration will save you troubleshooting headaches later.
Configuring Your Price Rounding Strategy: A Foundation of Flex Pricing
Your first crucial configuration will be to set up your price rounding strategy. This foundational setting—found under Store Settings > Rounding Strategy within your Flex Pricing dashboard—determines how your dynamic prices appear to customers.

There are three choices here, with two centering around $29:
- Psychological rounding. The first strategy rounds prices under $29 to the nearest nine cents, and to the nearest 99 cents for prices above $29. This maintains the psychological pricing benefits that prove effective in retail environments. For instance, a calculated price of $20 becomes $19.99, while $146.48 becomes $145.99. This strategy is one that’s great for general retail applications.
- Clean rounding. This rounds to the nearest ten cents for lower prices and to the nearest dollar for higher prices. This works well for premium brands where round numbers can convey quality and transparency. A price of $26.44 becomes $26.40, while $296.49 becomes $296.00.
You can also choose a third option for no rounding, which will maintain the exact calculated prices. While this might seem the most straightforward, my opinion is that only B2B setups would benefit, or maybe where regulatory requirements demand precise calculations.
How to Use Flex Pricing to Apply Dynamic Pricing Rules: 6 Real-World Scenarios for Your Store
With setup and rounding strategies complete, we can turn to applying dynamic pricing to your store’s products and services.
None of these are in any order, and again, take a look at our dedicated review to understand how to find and set these rules within Flex Pricing.
1. Distance-Based Pricing for Furniture and Home Goods
Furniture retailers face a constant challenge: offering low or even free shipping while trying to maintain a profit across a wide range of delivery areas. Shipping costs can eat up a lot of revenue on large items, yet customers expect free delivery (or at least the lowest cost).

The idea with dynamic distance pricing is to incentivize nearer shoppers with lower delivery costs, and increase that price for those who are further away. A clean rounding strategy is essential for distance-based pricing. Here’s why: when customers see prices adjusted for their location, they’re more likely to accept and understand round numbers.
For example, a base price of $499 might become $520 for distant locations rather than $519.99. This transparency helps customers understand that they pay more for distance while maintaining a professional appearance. In contrast, the psychological pricing strategy could make regional differences appear more manipulative.

When configuring your rule, it’s vital to set your store’s address within the Store Settings screen:

You could also set exclusion zones for areas you don’t service. For instance, consider creating a graduated scale of distance brackets that aligns with your rounded prices—say, $500, $520, $550—rather than arbitrary percentage increases.
2. Optimizing for Customer Demographics Within High-End Fashion
We’ve known for years that different levels of income for a shopper causes them to have a different relationship with the price of a product. Around 70 percent of low-income shoppers consider the price to be an important purchasing factor.
High-end fashion stores will focus on other facets to sell to the consumer, but the presentation of the cost is still going to be important.

For high-end fashion, clean rounding is again the best option as it aligns with the premium brand image you’d want to maintain. While psychological pricing is common across most retail, it can also cheapen the perception of luxury goods. When a base price of $299.99 becomes $300 or $320 based on demographics, it presents a more sophisticated image than $319.99.
For this rule, configure your income brackets with these round numbers in mind. For example, set your increases to hit clean price points: a $300 item might become $350 in high-income areas rather than $342. This approach will help to maintain your brand’s positioning using dynamic pricing. Ultimately, customers in higher-income areas are actually more likely to complete a purchase when seeing clean, round numbers.
3. Device-Based Price Optimization for Electronics and Tech Stores
There are numerous studies that show this, but in general, iPhone users earn more and spend more per year than Android users. While I don’t see this strategy in place a lot (if ever), a device-based pricing strategy might have value if you’re in the electronics business. Often, retail environments can have intense competition and tight margins, even outside of tech.
This approach is something DoorDash has allegedly used, which an ongoing lawsuit is trying to prove. As such, you’ll want to ensure that you’re legally making the right choices if you want to implement this pricing strategy.

In contrast to the other retail examples so far, psychological pricing is best here because it matches established industry norms. Customers in this sector are price-sensitive and undertake a lot of comparison shopping.
To implement this type of device-based pricing, maintain endings in .99 or .95 to stay competitive. For example, if your base price is $499.99 for Android users, an eight percent increase for iOS users should land at $539.99, not $540.

Adhering to psychological pricing principles is noteworthy for the electronics industry because prices often serve as mental anchors for value comparison. A MacBook user seeing a price of $540 might immediately round up to $600 in their mind, while $539.99 tends to be perceived as “in the $500 range”. As such, ensure your percentage adjustments result in these optimal price points by testing different variations in your rule settings.
4. A Time-Based Pricing Strategy for Beauty and Cosmetics Shops
It might seem fanciful, but studies show consumer price sensitivity decreases based on the time of day and reaches its lowest point around 11PM. Given this, you might consider a time-based pricing strategy if you run a beauty or cosmetics retail business.
For beauty products, your choice of rounding strategy depends on your brand positioning. A mid-market brand should stick with psychological pricing to maintain familiar price points throughout the day. However, premium beauty brands might prefer clean rounding to reinforce the luxury positioning.
The key is consistency. If you start with psychological pricing, you should maintain it across all time periods to avoid customer confusion.

Setting this pricing rule, look to configure your time windows to transition smoothly between price points. For example, for psychological pricing, a $29.99 product might become $31.99 during peak evening hours rather than jumping to $32. For premium brands using clear rounding, smooth transitions from $30 to $32 maintain the sophisticated pricing image while capitalizing on reduced price sensitivity.
5. Inventory-Based Dynamic Pricing: A Classic for Seasonal Products
Seasonal inventory often ends up being heavily discounted due to poor timing of markdowns. Dynamic inventory-based pricing is one way to help automate this process while maintaining optimal margins.

Your rounding strategy for inventory-based pricing should reflect the urgency of your stock situation. Psychological pricing is excellent for when you need to move inventory quickly. Prices ending in .99 or .97 signal discounts to customers. However, for low-stock items where you’re increasing prices, clean rounding can help to justify higher price points through perceived scarcity.

When setting up inventory thresholds, they should align with your chosen rounding strategy. For psychological pricing, set your adjustments to land at attractive price points: $24.99, $19.99, $14.99, and others. For clean rounding, use clear price drops instead: $25, $20, $15. This consistency in presentation can help customers understand your inventory clearance strategy, even subliminally.
6. Market-Based Pricing for Multi-Regional Stores
If you take a look at the data, it shows significant variations in consumer purchasing power across different regions. This can be something to be mindful of as much as distance and other factors.
The State CPI Based Rule lets you implement sophisticated regional pricing based on these local market conditions. For multi-region pricing, clean rounding typically works best. Regional price differences can be more palatable to customers if you show them as clear, round numbers that reflect local market conditions.
As an example, a product priced at $100 in one region might be $120 in another. This transparent approach is easier for customers to accept than prices such as $119.99.

To succeed with this rule, configure your regional adjustments to maintain this clarity across all markets. Rather than applying straight percentage increases, adjust them to hit round price points in each region. This will help you explain price differences when necessary and maintain a professional image across all locations.
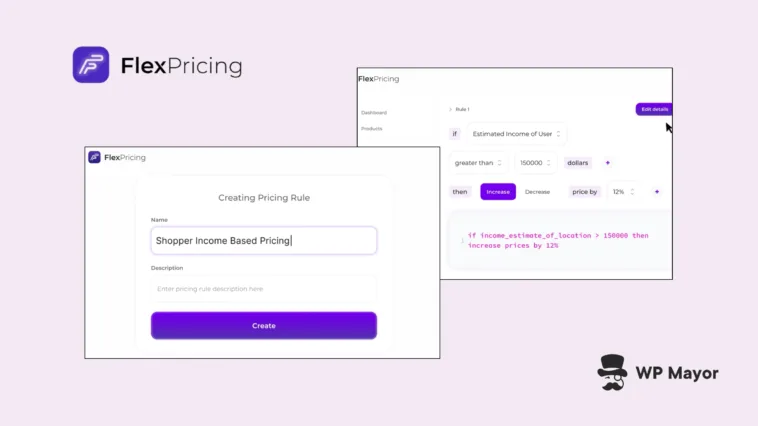
How to Create Custom Pricing Rules
While preset rules cover many common scenarios, you might need to create custom rules for your own unique requirements. Through the Create button within the Pricing Rules screen, you can combine multiple conditions and actions to create sophisticated pricing strategies.

The interface uses an intuitive ‘If Then’ formula structure that lets you build complex rules without coding. You’ll find several categories of conditions and rules:
- User attributes. Target based on estimated income or operating system
- Location. Adjust prices based on distance, state, or zip code
- Stock. Modify pricing based on inventory levels
- Time and date. Create time-sensitive pricing including holiday periods
For instance, you can create a rule that combines multiple factors for a holiday season promotion targeting specific regions. First, add a condition using the Holiday selector under Time and Date Rules:

You could then add a second condition to price based on the State User is in:

Once you save your changes, your rule will be live and active. This flexibility lets you create highly targeted pricing strategies combining practically any of the conditions in ways that will help you set the strategy you desire.
Transform Your WooCommerce Store Today
Dynamic pricing can represent a significant advancement when it comes to costing up your product and services. Flex Pricing makes these sophisticated strategies accessible to you regardless of the size of your store.
You need to start with clear objectives, along with knowing the intricacies of the pricing model you want to employ. From there, you’ll want to implement the strategy, test it out, and tweak it to perfection using Flex Pricing’s pricing rule editor.
Is dynamic pricing something you want to experiment with for your WooCommerce store, and will Flex Pricing become part of your workflow? I’d love to hear about your experience in the comments section below!