Have you checked your old WordPress form submissions lately? 🤔
Forms are one of the best ways to connect with visitors. You might use them for questions, orders, surveys, or even donations. But once those entries are answered or processed, what happens to them?
If you’re not managing your submissions, all that personal data just piles up in your database. That can create two problems at once.
First, many privacy rules like the GDPR say you can only keep personal details for as long as they’re needed, so holding on to them indefinitely could put your site at risk. Second, a database that’s crammed with old entries can eventually slow down your website.
The good news is that WPForms has a feature that automatically deletes old entries for you. I’ve used this on my own sites, and it’s saved me hours of cleanup while keeping things fast and compliant.
In this guide, I’ll show you exactly how to set it up.
Why Should You Auto Delete Form Entries in WordPress?
Auto-deleting old form entries in WordPress keeps your site fast and secure while reducing the risk of storing unnecessary personal data. It’s also an easy way to stay compliant with privacy laws.
Privacy regulations like the GDPR and CCPA require that you only keep personal data for as long as it’s needed. That means once a visitor’s question has been answered or an order is fulfilled, you shouldn’t hold on to those details indefinitely.
Here are the other main benefits of auto-deleting entries:
- Lower security risks: Deleting old entries limits the personal information available if your database is ever hacked.
- Improve performance: Keep your WordPress database lean and your site fast.
- Smaller backups: Save storage space and make backups quicker to run.
- Accurate reporting: Prevent outdated or spammy entries from skewing your analytics.
I’ve seen this firsthand on small business sites I’ve helped set up. For example, freelancers or coaches often get daily inquiries through a contact form. Once those messages are answered, there’s no reason to store them indefinitely.
On my own sites, I’ve also noticed how quickly old form data piles up. As entries pile up, they add unnecessary bulk to your database and backups, which can make them slower to run.
👉 In short: auto-deleting old form submissions protects user data, speeds up your site, and helps you focus only on the entries that matter.
In the next section, I’ll show you how to set up auto deletion step by step. You can use the quick links below to jump straight to different parts of the tutorial:
How to Auto Delete Form Entries in WordPress
The easiest way to delete form entries automatically is by using WPForms, the best drag-and-drop form builder plugin for WordPress.
To handle form entry cleanup, WPForms offers an Entry Automation addon, which lets you set up automated tasks like deleting or exporting entries for specific forms.
You can choose exactly when the task should run — daily, weekly, monthly, or on a custom schedule. You can even set rules to only delete entries with specific data or a certain status.

At WPBeginner, we use WPForms for everything from simple contact forms to advanced surveys, and we’ve tested the Entry Automation addon thoroughly. It works reliably behind the scenes and helps you keep your sites GDPR-compliant.
If you want to learn more about the plugin, check out our full WPForms review, where we evaluate all its features.
Now, let’s walk through how to set up form entry deletion, step by step.
✅ Step 1: Install and Activate WPForms
To get started, you’ll need to install and activate the WPForms plugin on your WordPress site.
If you haven’t done this before, don’t worry — it’s easy! We have a step-by-step guide on how to install a WordPress plugin that walks you through the process.
🚨 Note: WPForms has a free version. However, the Entry Automation addon is only available with the Elite plan.
This version also includes other powerful features for business owners, like advanced payment integrations, surveys and polls, and premium support. That makes it a great choice for growing businesses.
After you activate the plugin, go to the WPForms » Settings page from your WordPress dashboard to add your license key. Make sure you are in the ‘General’ tab.
☝Note: You can find your license key number in your WPForms account profile in the Downloads tab.
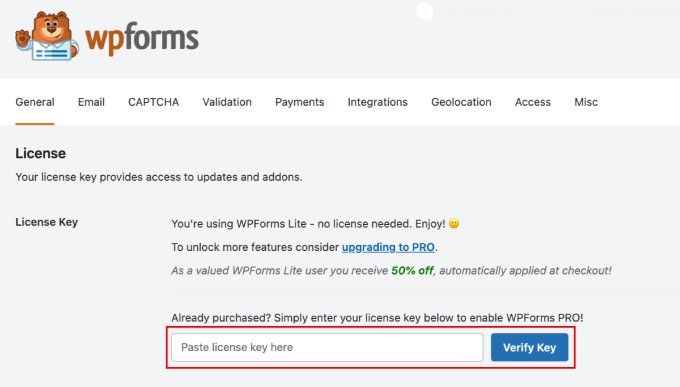
Once you enter your license number, click the ‘Verify Key’ button.
Now, all the premium features available in your plan, including access to addons like Entry Automation, will be unlocked.
Next, go to the WPForms » Addons page in your WordPress admin sidebar and look for the ‘Entry Automation’ addon.
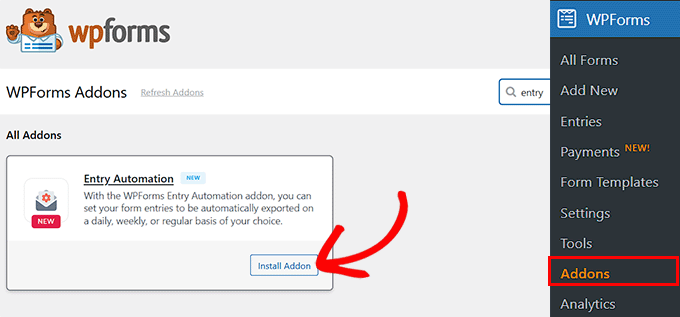
When you find it, simply click the ‘Install Addon’ button to activate it on your website.
✏️ Step 2: Choose or Create the Form You Want to Auto Delete Entries From
Now that WPForms is set up, the next step is to choose or create the form you want to auto delete entries from.
If you’re working with an existing form, just go to the WPForms » All Forms page in your WordPress dashboard.
Find the form you want to use and click the ‘Edit’ link under its name.

This will open the form in the visual builder.
If you don’t have a form yet, then you can create a new one by going to the WPForms » Add New page.
Start by giving your form a name, like ‘Contact Form’ or ‘Support Request.’ I recommend choosing a title that clearly defines the purpose of the form.
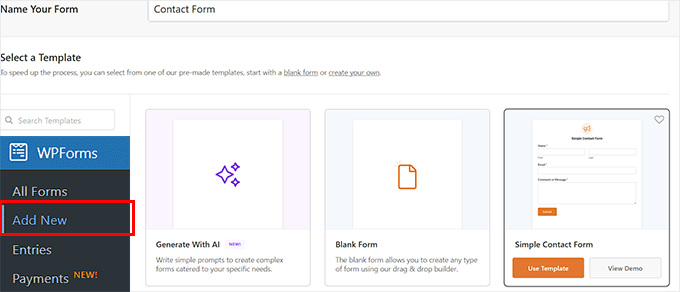
Then choose a template that fits your needs. WPForms offers many beginner-friendly templates, like a simple contact form, a quote request form, a feedback form, and more.
If you’re not sure which template to use or want help getting started, then you can click ‘Generate with AI’ to try the AI Form Builder.
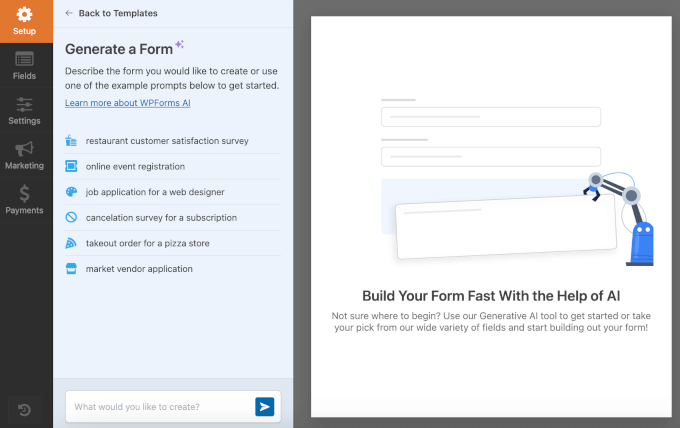
In the field that says ‘What would you like to create?’ just describe the type of form you want.
For example, you could write “a basic contact form with name, email, and message,” and it will generate the layout for you.
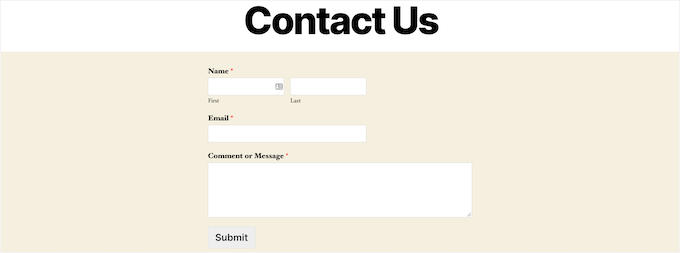
Once you have opened your new or pre-existing form in the drag-and-drop builder, you can add fields like name, email, phone, message, dropdowns, checkboxes, and more.
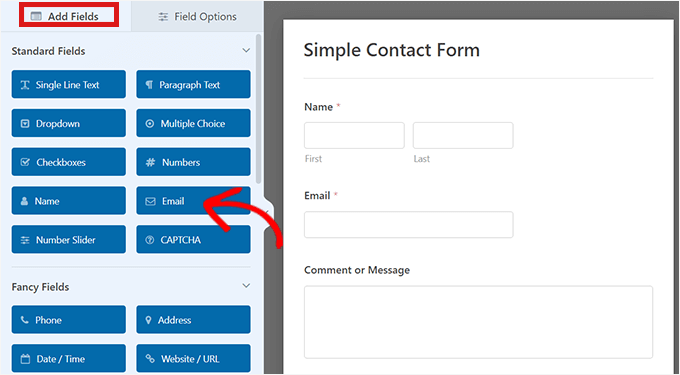
You can easily move them around to customize the layout however you want — no coding needed.
If it’s your first time creating a form, you might find these tutorials helpful:
Once you’re happy with your form, you’re ready for the next step.
💡 Step 3: Back Up Your Data by Exporting Entries First (Optional but Recommended)
Before setting up the automatic deletion, I strongly recommend that you back up your form data first.
While auto-deleting entries helps keep your website clean and compliant, the insights you get from that data can be very valuable for your business.
This is where you can create a smart workflow: first, automatically save the data you need for business analysis in a secure, off-site location.
Then, have the old personal data removed from your WordPress site. This is the best way to balance data analysis with GDPR compliance.
For example, I know business owners who send new lead forms straight to their CRM so they can track sales without worrying about old entries piling up.
Nonprofits I’ve worked with have downloaded donor surveys into a CSV file at the end of a campaign so they can review the results, then clear the original entries to protect privacy.
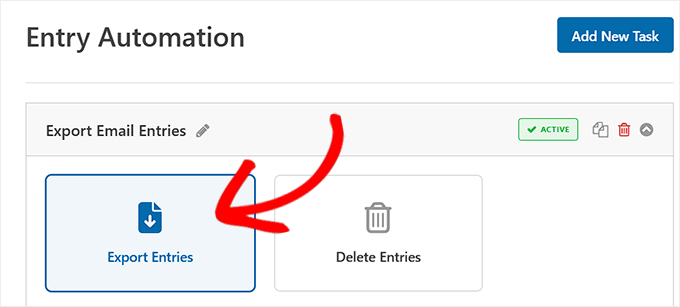
The good news is that the same Entry Automation addon makes exporting or downloading entries just as easy as deleting them.
For a step-by-step walkthrough, see our tutorial on how to auto-export form entries in WordPress.
🔁 Step 4: Create a Deletion Task for the Form
Once you’ve set up your exporting workflow, you’re ready to set up the deletion automation.
To do this, go to the Settings » Entry Automation tab in the left-hand menu of the WPForms builder. Here, you can create tasks that automatically export or delete form entries based on your schedule and rules.
Once you’re in the ‘Entry Automation’ tab, simply click the ‘Add New Task’ button.

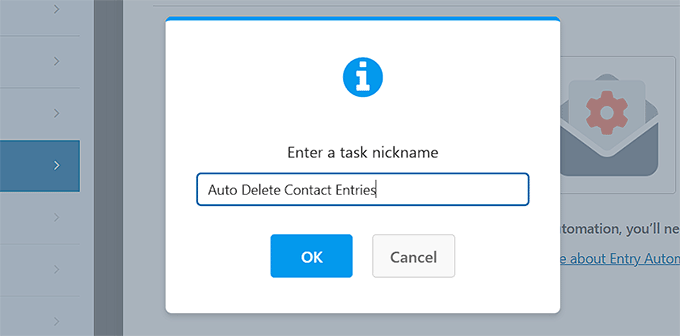
A pop-up will appear asking you to name your task. I recommend choosing something simple and clear, like ‘Auto Delete Contact Entries‘ or ‘Cleanup Task for Survey.’
Naming your tasks helps you quickly recognize them later if you ever want to make edits or check your automation settings.
This task will work like a mini workflow that runs behind the scenes.
☝ Keep in mind that if you want to auto-delete entries for other forms, you’ll need to repeat this process for each one.
However, you can create multiple automation tasks for the same form — for example, one to export entries to Google Drive, and another (like this one) to automatically delete old data.
After you add a title, just click the ‘OK’ button.
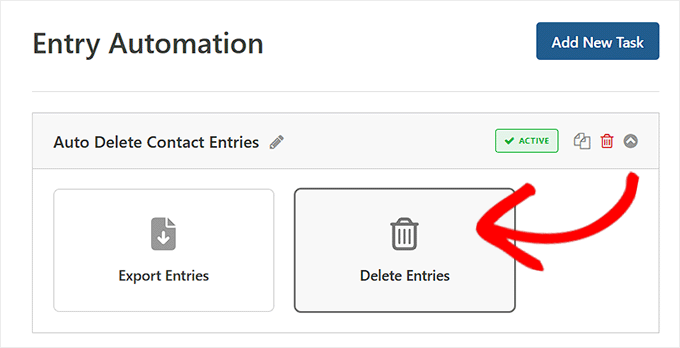
On the next screen, choose ‘Delete Entries’ as the task type.
Doing this will open some new settings on your screen.
🧹 Step 5: Set Up Filters to Control What Gets Deleted
After choosing to delete entries, you’ll see the Filters section. This part gives you precise control, so you only remove what you don’t need.
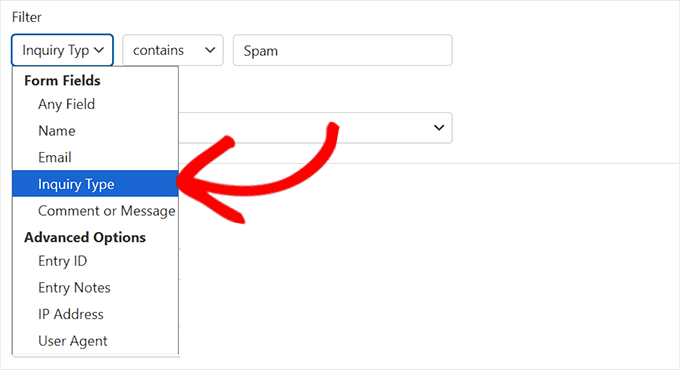
First, you can filter entries based on what users type into your form fields. This is perfect for automatically cleaning out low-priority submissions.
For instance, a popular blog might receive dozens of guest post submissions and reader questions, and many of these are off-topic pitches or spam.
In this case, setting up a filter to delete entries where the ‘Inquiry Type’ field is marked as ‘Guest Post Pitch’ or ‘Spam’ helps keep the inbox focused on genuine reader questions and high-quality submissions.
Next, you can filter entries by their status. This is really useful for getting rid of junk submissions and incomplete entries.
The available statuses are:
- Published – Fully submitted entries.
- Partial – Entries where someone started the form but didn’t finish.
- Abandoned – Incomplete entries that timed out.
- Spam – Entries flagged as spam by tools like CAPTCHA.
- Trash – Entries you have already moved to the trash.
I always recommend selecting ‘Partial’ and ‘Spam’ here. It’s an easy way to automatically clear out clutter from your database.
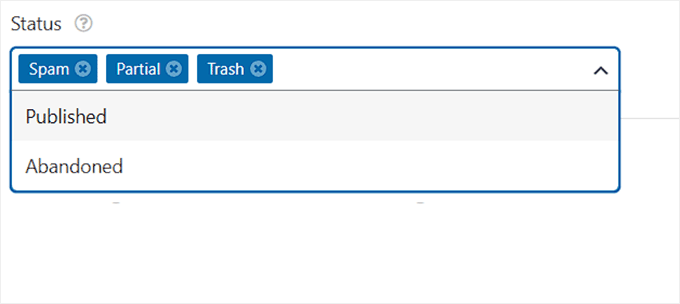
You can even combine these filters for more powerful automation.
For instance, you could set up a rule to delete only ‘Published’ entries that are related to a past event or a closed job application.
🗓️ Step 6: Schedule Automatic Deletion of WordPress Form Entries
Once your deletion settings and filters are all set up, the final step is to schedule when WPForms should run the automatic cleanup.
To do this, scroll down to the ‘Schedule’ section.
Here, you can easily decide how often you want the deletion task to run — daily, weekly, or monthly — depending on how often you want to clear out old or unwanted entries.
Next, choose the specific day(s) for the task to run. For example, you might want to delete entries every Friday, or on the 1st of each month.
You can even add a start date and an optional end date if this is a short-term cleanup.
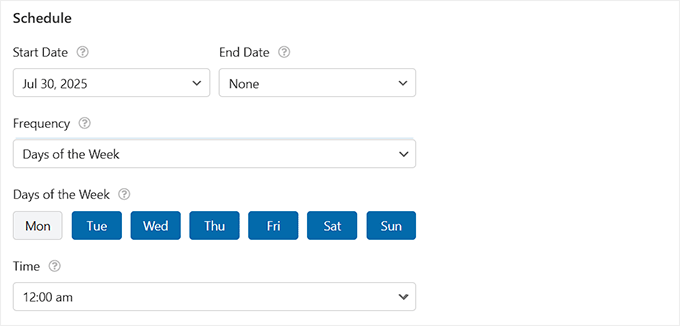
By default, the task will run at midnight (based on your website server’s time), but you can customize the time to fit your workflow, like after office hours or before your team starts their day.
Once you save the schedule, WPForms handles everything in the background — automatically deleting entries based on your settings without any manual effort.
🚨 Important: Just as a final reminder, this deletion is permanent. Once an entry is gone, it cannot be recovered from WordPress, which is why I recommend exporting it first if the data is important.
Finally, click the ‘Save’ button at the top to store your settings.
If you’re editing an existing form, then the deletion schedule will start running automatically — no extra steps needed.
However, if you’ve just created a new form with this auto delete feature, make sure to embed it on a page or post so it can start collecting entries.
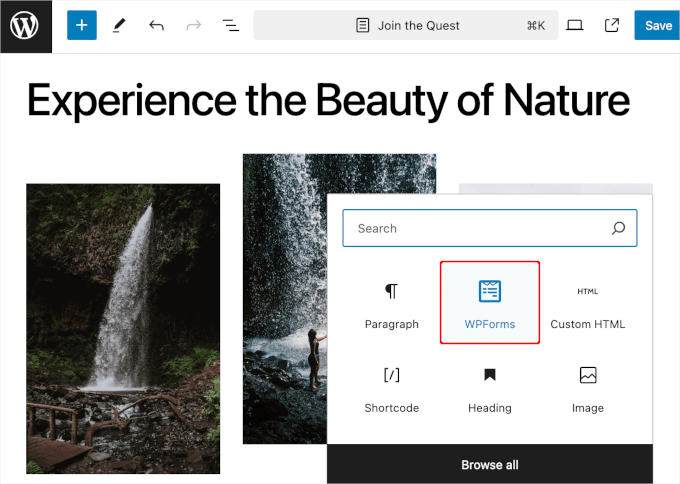
📌 Need help with that? Check out our step-by-step guide on how to embed a form in WordPress.
🔐 Bonus: Go Beyond Auto Deletion — Make Your Forms GDPR Compliant
Once you’ve set up automatic form entry deletion to reduce data and stay GDPR-friendly, you can take things further by enabling additional privacy features in WPForms.
It’s one of the best GDPR-friendly plugins available and offers several built-in tools to help you limit personal data collection, request user consent, and support compliance across your site.
Here’s how you can improve compliance with just a few clicks:
- ✅ Add a GDPR Agreement Field: Use this to get clear consent from users before collecting their data. It’s required and unselected by default to meet GDPR standards.
- 🔒 Turn Off User Tracking: Disable the collection of IP addresses, user agent info, and cookies to reduce data collection from the start.
- 🧾 Allow Data Access and Deletion Requests: Build forms that let users request to view or delete their personal info, as required by law.
- ⚙️ Adjust Settings Per Form: Choose which forms collect sensitive data and apply stricter rules only where needed.
These features work together to make your entire data collection process more transparent, secure, and compliant.
For a complete walkthrough, check out our tutorial on how to create GDPR-compliant forms in WordPress.
Frequently Asked Questions About Deleting Form Entries in WordPress
Now, let’s answer some of the most common questions our readers have about automatically deleting form entries in WordPress.
How does auto deleting entries help with GDPR?
GDPR requires you to store personal data only as long as necessary. By auto deleting entries after a certain period, you minimize data retention risks and stay compliant. It also shows users that you care about their privacy.
What is the best schedule for deleting form entries?
That depends on your site’s needs. For busy sites, daily or weekly deletion keeps things clean. For lower-traffic sites, monthly might be enough.
WPForms gives you the flexibility to choose a schedule that works for you. Plus, you can change it anytime you like. Just set it, and WPForms will handle it automatically in the background.
Can I delete form entries from all forms at once?
The auto-delete feature in WPForms is designed to work on a per-form basis. This means you will need to enable it individually for each form where you want to use it, and you can set up different rules. For example, you might want to delete contact form entries quickly but keep survey responses for a longer period.
What happens when an entry is auto deleted?
When WPForms auto-deletes an entry, it’s permanently removed from your WordPress database. It won’t be sent to the Trash or stored in a backup inside WPForms. That’s why it’s a good idea to export important entries before the deletion runs, just in case you need them later.
Can I stop WPForms from storing entries at all?
Yes, you can! WPForms has a feature that lets you disable entry storage completely. This is useful if you just want to receive form submissions by email and don’t want to keep them in the database. It’s a great option for GDPR compliance and data minimization.
📚 More Tips to Stay GDPR-Compliant in WordPress
Want to go beyond auto deleting entries? We’ve put together some helpful guides to make your WordPress site even more privacy-friendly.
Whether you’re new to GDPR or just want to tighten things up, these resources will walk you through each step:
If you liked this article, then please subscribe to our YouTube Channel for WordPress video tutorials. You can also find us on Twitter and Facebook.
