I know how stressful it is to watch the news about AI and wonder if your website will survive. That’s why choosing the right SEO plugin for the AI search era can feel like a high-stakes decision for your business.
I’ve spent months testing Rank Math vs. All in One SEO to see which one actually keeps your traffic safe. You need a tool that handles the technical heavy lifting so you can focus on your work.
In this review, I’ll share my personal experience using both tools on real websites. I found that one of these plugins is far better at preparing your site for the future of AI.
I want to help you feel confident that you aren’t just guessing with your SEO. My goal is to show you which choice will grow with your business without causing technical headaches.
Quick Summary: AIOSEO vs. Rank Math Comparison
If you are looking for the best SEO plugin to future-proof your site for the AI search era, All in One SEO (AIOSEO) is the winner. While Rank Math offers great tools for manual optimization, AIOSEO provides the specific technical infrastructure needed for Generative Engine Optimization (GEO).
- Winner for Businesses & Agencies: All in One SEO for its AI Keyword Reports, automated internal linking, and server-level speed.
- Winner for Hobbyists: Rank Math for those who prefer a high degree of manual control and granular “tinkering” with settings.
- The AI Advantage: AIOSEO is the only plugin that currently offers “Ghost Query” tracking to help you rank in ChatGPT and Gemini citations.
Before we dive into the in-depth comparison, here is my quick overview:
| Feature | All in One SEO (AIOSEO) | Rank Math |
|---|---|---|
| Setup Experience | 5-minute wizard; “Set and Forget” philosophy. | Detailed cockpit style; requires account connection. |
| AI Search Visibility (GEO) | AI Keyword Report: Tracks citations in ChatGPT & Gemini. | AI Search Traffic: Tracks clicks from AI search results. |
| AI Bot Optimization | Automated llms-full.txt with Markdown conversion. |
Basic llms.txt link list support. |
| Internal Linking | 1-click automation via Link Assistant dashboard. | Manual suggestions within the content editor. |
| Technical Speed | Server-level redirects (.htaccess/nginx) for max speed. | PHP-level redirects (slower processing). |
| Content Analysis | TruSEO 70-factor checklist + Headline Analyzer. | Focus keyword tracking + Content AI (credit-based). |
| eCommerce Tools | Automated “Expired Product” logic & AI Image Gen. | Standard product schema and manual redirects. |
| Pricing (Annual) | Starts at $49.50 (Elite Agency: $299.50). | Starts at $69.00 (Full Agency: $599.00). |
Why Trust WPBeginner?
Since 2009, WPBeginner has been helping millions of WordPress users build and grow their websites. We’ve used and worked with SEO plugins daily in real-world scenarios to grow our own businesses.
For this comparison, we used the premium versions of both All in One SEO and Rank Math in live testing environments to evaluate every feature, technical setting, and AI integration they offer.
For more information about how we evaluate WordPress tools, see our editorial guidelines.
I have broken down this comparison into the following key sections:
1. Installation and Setup: Which is Easier?
Setting up an SEO plugin should be straightforward. You want a tool that configures the basics correctly without asking a hundred confusing questions.
All in One SEO (AIOSEO) Setup
AIOSEO uses a very friendly step-by-step setup wizard. The first thing you notice upon plugin activation is how it immediately launches a “Let’s Get Started” screen that feels very welcoming.
It will then ask for your website category. You can pick if your site is a blog, news site, online store, or small business. I found this helpful because it tailors the settings for you.
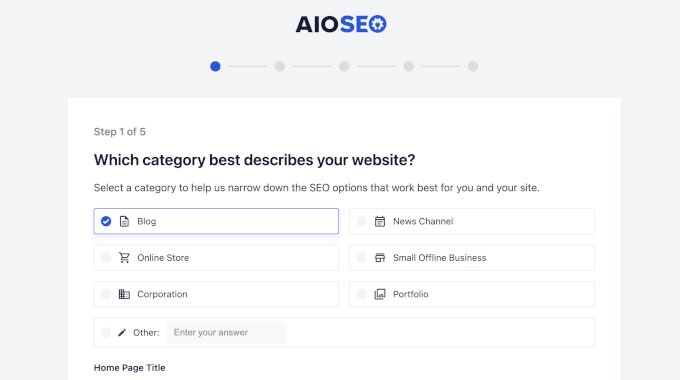
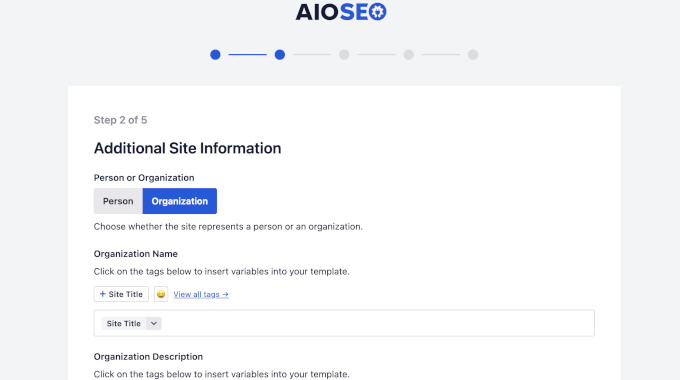
I really like the “Person or Organization” step. This is where you add your logo and social profile URLs. Google uses this data for its Knowledge Panel, and AIOSEO makes it simple to fill out.
The wizard also handles advanced technical SEO settings for you behind the scenes. You can still tweak those settings if you want, but the wizard gives you an optimal starting point.
If you want to follow along, we have a detailed guide for AIOSEO that walks you through every single step.
I found that most users can finish the entire process in less than 5 minutes.
Rank Math Setup
Rank Math also has a setup wizard, but it feels a bit different. When I activated it, the first thing I saw was a prompt to connect a Rank Math account.
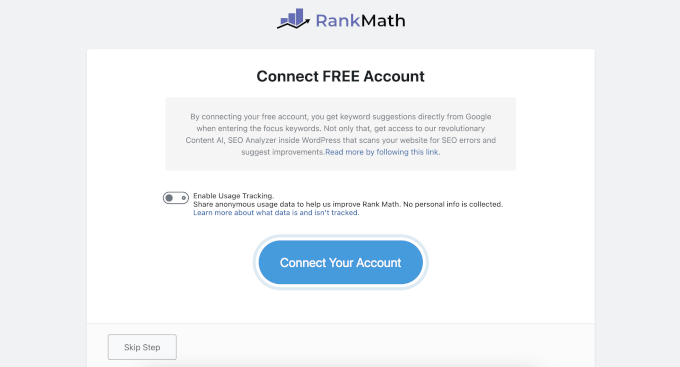
I found this a bit frustrating because I had to create yet another account just to use the plugin. You can skip it, but you lose access to some of the best features.
Once inside, you have to choose between Easy, Advanced, or Custom modes. I noticed that many beginners choose “Easy,” but then they miss out on the advanced schema tools later.
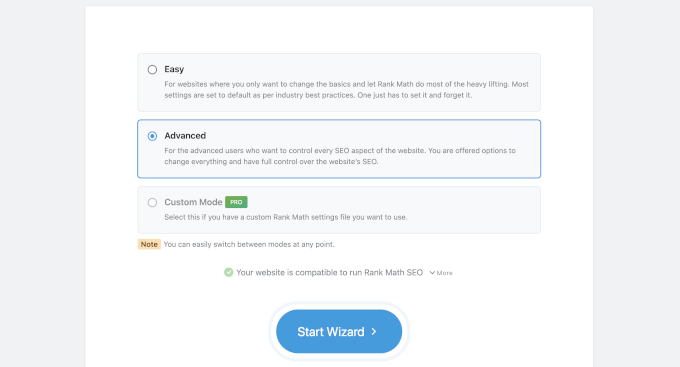
I was impressed by the compatibility check. It scans your site for conflicting plugins before you start. This prevented a lot of technical headaches for me during my testing.
I found the Rank Math wizard to be very detailed. It covers everything from Sitemap configuration to Role Manager. However, it feels more like sitting in the cockpit of a plane with many toggles and switches.
Winner: All in One SEO
I recommend All in One SEO for this category. It follows the “Set and Forget” philosophy that is so important for busy business owners. It makes smart decisions for you right out of the box.
Rank Math is excellent if you love to “tinker” with every small detail. But for a clean and fast setup, AIOSEO is the clear winner for beginners.
I found that a smooth setup sets the stage for everything else. Now that we have the foundations ready, let’s look at how these tools help you with your daily SEO work.
2. Day-to-Day SEO Tasks (Optimizing Content)
Most of your time won’t be spent in the plugin settings. It will be spent inside the WordPress block editor, writing content, creating pages, and managing your business.
I wanted to see which tool actually helps you write better and more SEO-friendly. In other words, which plugin offers a better on-page SEO experience for users?
On Page SEO Features at a Glance
The following table compares the on-page SEO features available directly within the WordPress editor for both plugins.
This comparison highlights how each tool helps your team during the actual content creation process.
| Feature | All in One SEO (AIOSEO) | Rank Math |
|---|---|---|
| Content Analysis | Uses TruSEO Analysis, focusing on readability, semantic relevance, and search intent rather than just keyword frequency. | Uses a “gamified” approach focused primarily on rigid keyword-density metrics, which some experts find outdated. |
| AI Writing Assistant | Integrated with SEOBoost to provide intent-based briefs and suggestions based on analyzing the “Top 10” ranking results. | Features “Content AI”, a credit-based suite providing 40+ templates and a “RankBot” chat assistant directly in the editor. |
| Metadata Generation | Offers Contextual AI Generation for titles and descriptions. It sends the actual post content with the prompt to ensure factual accuracy and minimize hallucinations. | Provides AI-powered meta tag generation and bulk rewriting tools, though it functions more as a general writing assistant than a contextual one. |
| Visual/Image SEO | Features an AI image generation integration that allows users to generate unique images directly within the editor to avoid “stock photo” penalties. | No native image generation. The focus is limited to automating Alt text and Title attributes for existing images using predefined patterns. |
| Internal Linking | The Link Assistant identifies “Orphan Pages” and lets you insert links with a single click, without manually finding anchor text or copying URLs. | Provides link suggestions in the sidebar. Users must manually copy and paste the link into the content, which slows down the workflow. |
| Editor Interface | Maintains a clean, professional UI following a “Decisions, not Options” philosophy. | Includes visual clutter, such as “Write with AI” buttons inside content fields and dashboard ads for credit upsells. |
Now, I’ll walk you through my experience with each of the plugins.
AIOSEO: The TruSEO Experience
When you write a post with AIOSEO, you get a TruSEO score in the top right corner. I found this incredibly motivating. It isn’t just a number. Instead, it’s a smart checklist of over 70 different SEO factors.
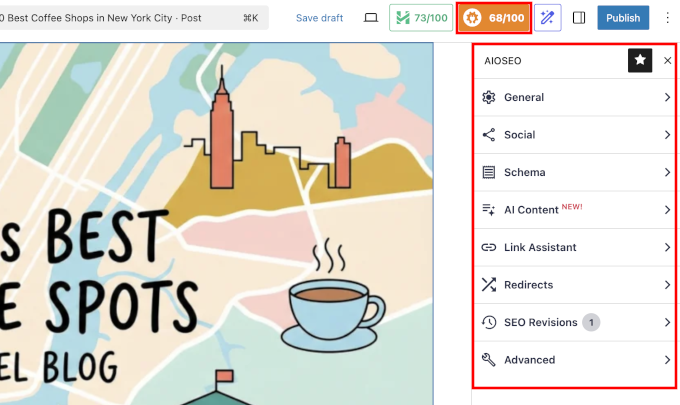
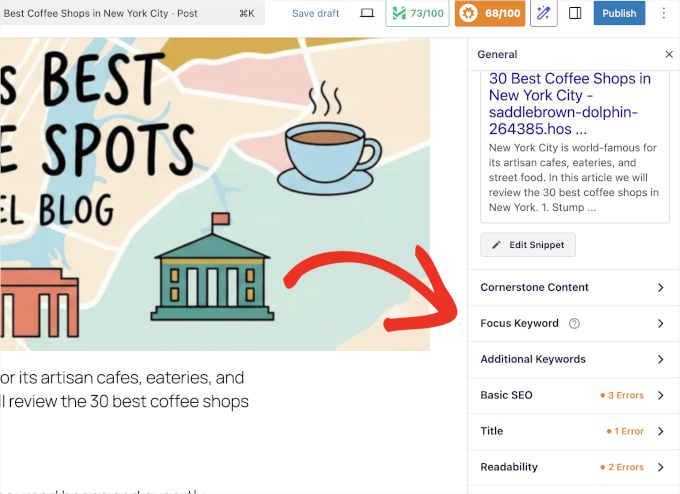
I really like the General tab. It breaks your post down into “Basic SEO,” “Title,” and “Readability.”
For example, if your paragraphs are too long, AIOSEO will highlight them in orange and tell you exactly how to fix them. It feels like having a professional editor looking over your shoulder.
Another feature that stands out is the Headline Analyzer. Before I publish, I always check my title score. It looks for “Power Words” and “Emotional Words” that encourage people to click.
I managed to increase the click-through rate on my latest tutorial just by following the suggestion to add an “action” word to my title.
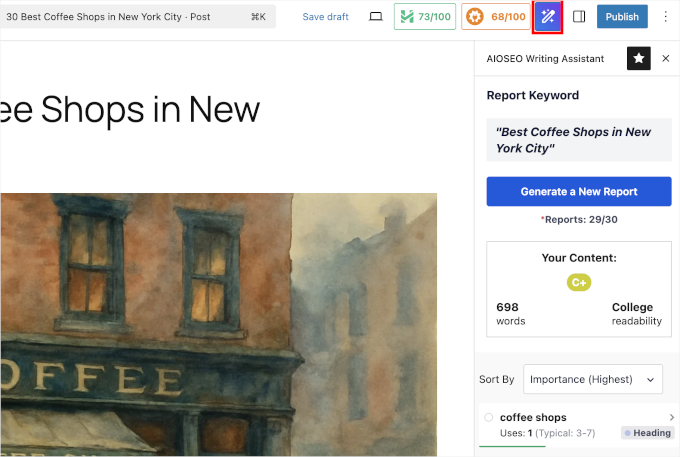
Another bonus tool worth mentioning is SEOBoost. It is a powerful AI Writing Assistant that offers real-time SEO guidance within the WordPress editor. Get keyword suggestions, readability checks, competitor insights, and more – all in one place. The downside is that it requires a paid SEOBoost subscription (Starting from $22.50).
Apart from the usual Focus Keyword, Title, and Meta Description optimization, AIOSEO comes with full support for schema markup with built-in blocks for several popular content types like recipes, products, FAQs, table of contents, and more.
Rank Math: The Data-Driven Approach
Rank Math takes a similar but slightly different approach. The free version allows you to track up to 5 focus keywords, which is very generous.
I found this helpful when I wanted to rank for a main topic and a few related sub-topics at the same time.
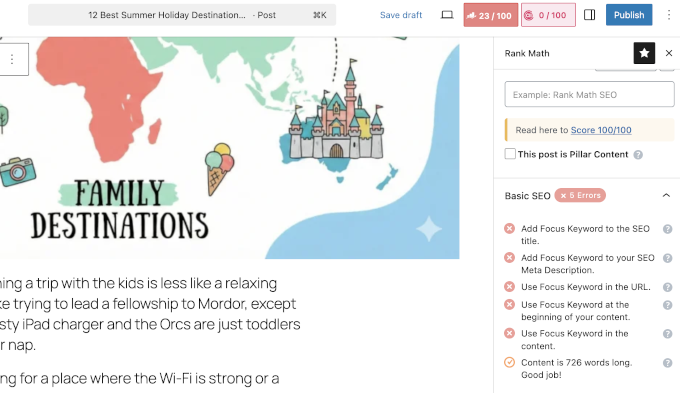
They also have a feature called Content AI. This uses artificial intelligence to scan the web and tell you exactly how many words, headings, and images you should use to beat the top-ranking sites. It gives you a “target” to hit, which is great for competitive niches.
However, I noticed that Rank Math’s editor can feel a bit “busy.” There are a lot of numbers and suggestions flying at you at once. If you are a minimalist writer, you might find the AIOSEO interface a bit more peaceful and easier to navigate.
Social Media Management
You want your posts to look great when they are shared on Facebook or X (Twitter). Both plugins have a “Social” tab, but I found AIOSEO’s preview to be more accurate.

In AIOSEO, you can choose which specific image from your post to display as the “Social Image.” This is a lifesaver if your featured image doesn’t quite fit the square Facebook layout.
Rank Math also offers this, but I found the “Overlay” icons in Rank Math to be a bit much for most professional business sites.
Winner: Tie Depending on Your Needs
AIOSEO is better for writers who want clear, actionable advice on making their content more readable and clickable.
On the other hand, Rank Math is better for SEO pros who want to “over-optimize” for multiple keywords and use AI to research their competition.
3. The New Frontier: Ranking in AI Search
Writing great content is only half the battle. In 2026, you also have to make sure the “robots” and AI Crawlers can read your site properly.
The rules of SEO have changed. It isn’t just about showing up in a list of blue links on Google anymore.
Google’s new AI Search and other AI platforms like ChatGPT, Claude, and Perplexity are answering the users directly without them ever visiting your website. These are called zero-click searches.
The strategy to survive in this landscape is called Generative Engine Optimization (GEO). Just like traditional SEO, GEO helps you position your brand to appear in AI answers, cited as sources, and mentioned as the authority.
I tested both plugins to see which one helps you survive this shift.
All in One SEO – The AI Search Optimization
The folks at All in One SEO are incredibly fast at adapting to the new AI search era.
Here are some of the features they have recently added to give users the cutting-edge advantage:
1. AI Keyword Report: Tracking “Ghost Queries”
AIOSEO includes a brand-new AI Keyword Report that I find revolutionary.
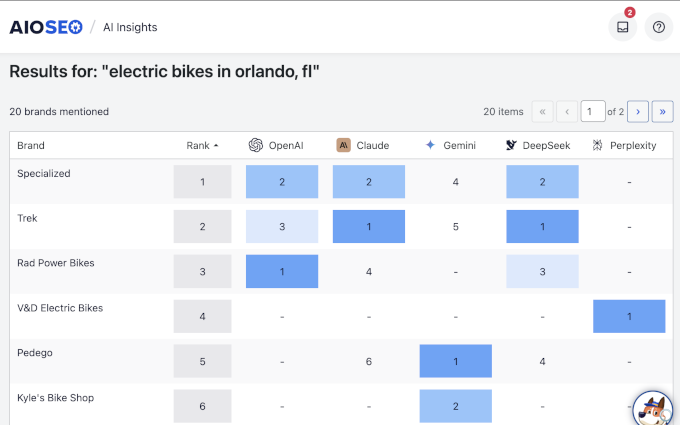
This tool shows you if ChatGPT or Gemini is actually citing your brand. I discovered what AIOSEO calls “Ghost Queries.”
These are terms where I rank #1 on Google, but AI search engines completely ignore me. AIOSEO helps me find these gaps so I can fix my content for AI platforms.
Related: See my tips on getting your content cited by AI Tools
2. Controlling the AI Crawl (llms.txt)
AI models need to “read” your site efficiently. AIOSEO makes it super easy to create an llms.txt file automatically.
It goes a step further with llms-full.txt. This automatically translates your content into “Markdown,” a clean text format that is much easier for AI robots to read and understand than standard HTML code.

3. AI Content and Image Generation
All in One SEO comes with built-in AI content generation.
Simply describe your content, and it will take care of the rest. This helps you write 10x faster and without leaving the WordPress dashboard.
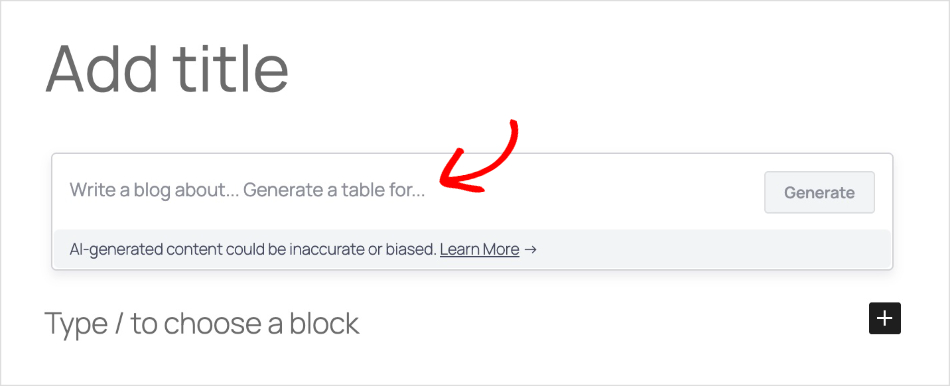
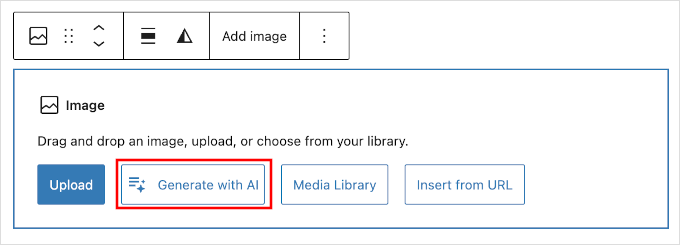
It goes beyond text and has an integrated AI Image Generator.
Simply add an image block to your content and click on the ‘Generate with AI’ button. Then describe the image you want to add, and it will generate it for you.
Rank Math – The Content AI
Rank Math takes a different approach. While AIOSEO focuses on helping you rank in AI results, Rank Math focuses heavily on helping you write content using AI.
Here is how their tools stack up for the AI era:
1. AI Search Traffic (Tracking Clicks, Not Rankings)
Rank Math introduced a feature called AI Search Traffic. It connects to your Google Search Console and analytics and filters the data to show you how many visitors came from AI tools like ChatGPT.
While useful, this is a “rear-view mirror” tool. It only tells you about the success you already had (the people who clicked). It stays completely blind to “zero-click” citations—where ChatGPT gives your answer, but the user never visits your site.
2. Content AI (Writing Assistant)
This is Rank Math’s biggest AI feature. It is a suite of 40+ AI writing templates built into your dashboard.
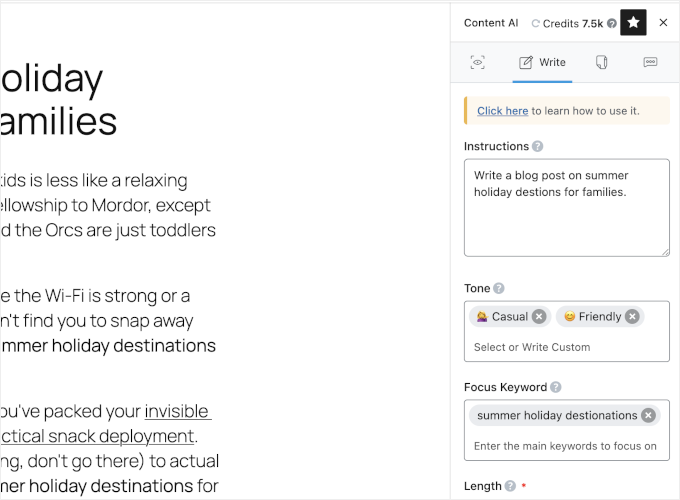
You can use it to write blog post outlines, fix grammar, or generate social media captions. It uses a credit system (you have to buy credits) to run.
Overall, it helps you produce content faster, but it doesn’t necessarily help that content rank better in AI search engines.
3. Basic llms.txt Support
Like AIOSEO, Rank Math allows you to create an llms.txt file to help AI bots find your links.
However, it currently lacks the advanced llms-full.txt feature with Markdown conversion. It points the bots to your pages, but it doesn’t translate the content into the “robot-friendly” language that AIOSEO does.
Comparison: Which SEO Plugin Wins on AI Features?
| Feature | All in One SEO (AIOSEO) | Rank Math |
|---|---|---|
| AI Goal | Ranking & Visibility (GEO) | Content Production (Writing) |
| Tracking | AI Keyword Report: Tracks your actual rankings and citations in ChatGPT. | Traffic Tracker: Tracks how many clicks you got from AI. |
| Robot Control | Advanced: Creates llms-full.txt with content converted to Markdown (easier for bots). |
Basic: Creates standard llms.txt link list. |
| Image AI | Generates Images: Creates unique images using DALL-E 3. | Optimizes Images: Writes Alt Text for existing images. |
Winner: All in One SEO (AIOSEO)
Rank Math has excellent writing tools, but there are plenty of free tools (like ChatGPT itself) that can do that.
All in One SEO is the clear winner here because it provides infrastructure. Its AI Keyword Report and llms-full.txt features give you a technical advantage that actually helps you rank in the new world of AI Search.
Rank Math helps you write, but AIOSEO helps you win.
4. Technical SEO Features (Made Simple)
Technical SEO is like the “plumbing” of your site’s SEO structure. If the pipes are broken, then search engines and AI agents cannot crawl or index your content effectively.
For businesses, having an SEO plugin that automates complex technical tasks makes a big impact.
For instance, fixing broken links or finding “orphaned content” manually can be time-consuming. You need a tool that handles this in minutes so you can prevent costly errors and save your team’s time.
All in One SEO
AIOSEO focuses heavily on automation and efficiency. My favorite feature here is the Link Assistant, which is a powerful internal linking tool integrated into your WordPress dashboard.
It automatically scans your entire site to find “Orphan Pages”. These are high-quality posts that have no internal links pointing to them.
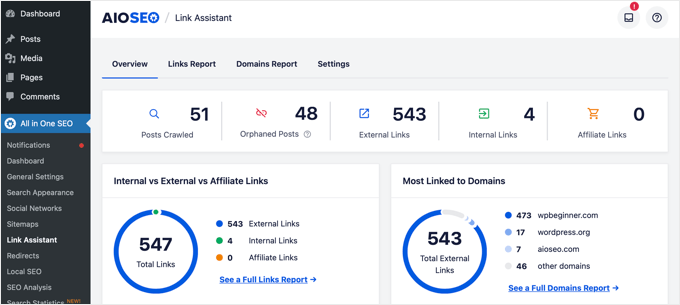
The real game-changer is the “One-Click Insertion” dashboard. You can add internal links to your posts directly from the Link Assistant report without ever opening the WordPress editor.
I estimate this saves about 40 to 50 hours of manual labor during a standard site audit.
On the infrastructure side, AIOSEO’s Redirection Manager is built for speed. It allows you to export redirects to server-level files (.htaccess or nginx).
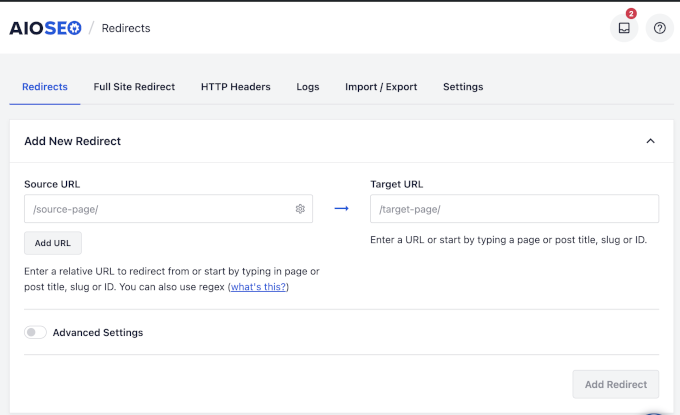
This makes your redirects lightning-fast because they process before WordPress or the database even loads. Its modern architecture uses separate database tables to keep your site fast as your business grows.
Rank Math
Rank Math offers a powerful set of technical tools, but the workflow often requires much more manual effort.
For internal linking, it provides suggestions in a sidebar while you are writing. However, you still have to manually copy the suggested link and paste it into your text yourself.

While Rank Math includes a Redirection Manager, it mostly relies on PHP-based redirection. This method is technically slower than AIOSEO’s server-level approach because the server must load the WordPress core before the redirect can execute.
Under heavy traffic, this can cause “Time to First Byte” lag. Additionally, Rank Math is sometimes criticized in technical circles for “feature bloat.”
Its feature-jamming approach can leave a larger footprint in your database, even if you disable certain modules.
The Winner: AIOSEO
All in One SEO is the clear winner for technical SEO.
While both plugins offer similar features on paper, AIOSEO automates the actual execution of these tasks.
The ability to inject internal links with one click and handle redirects at the server level provides a better Return on Investment (ROI) by saving you significant time and keeping your site fast.
5. User Experience & Site Performance (No More “Bloat”)
For a business, the user interface is not just about looks. It directly impacts how much work you and your team get done.
A “bloated” plugin can clutter your dashboard and make it harder for you to find things.
All in One SEO (AIOSEO)
AIOSEO follows a distinct design philosophy: “Decisions, not Options.” This means the plugin is designed to be clean, professional, and less intrusive.
I like that its onboarding wizard uses plain-English questions to configure technical settings in the background.
This allows you to set up your SEO in minutes rather than spending time searching Google to understand what everything means.
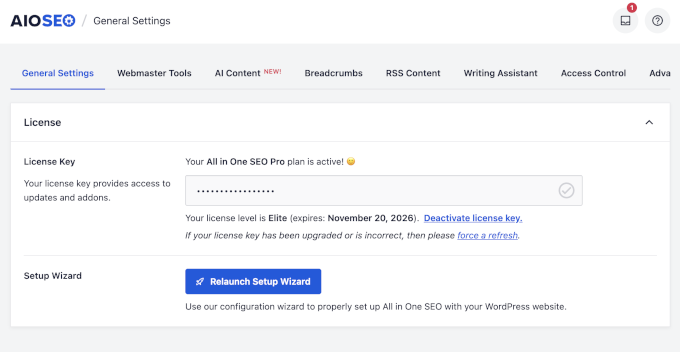
From a technical standpoint, AIOSEO is built for speed and stability. Following a complete code refactoring, the plugin uses separate database tables for its data.
This ensures that even as your site grows from a few dozen pages to over 100,000, the SEO plugin never becomes a performance bottleneck or slows down your WordPress admin dashboard.
I also like AIOSEO’s design aesthetics with readable typography, plenty of spacing, and clear navigation.
Rank Math
Rank Math is frequently criticized for “feature creep” or “bloat.” While it uses a modular design, code analysis suggests that even disabled modules can leave behind extra database tables and options that hurt performance.
I noticed that Rank Math’s dashboard can feel quite busy, making it harder for non-technical users to find what they need.
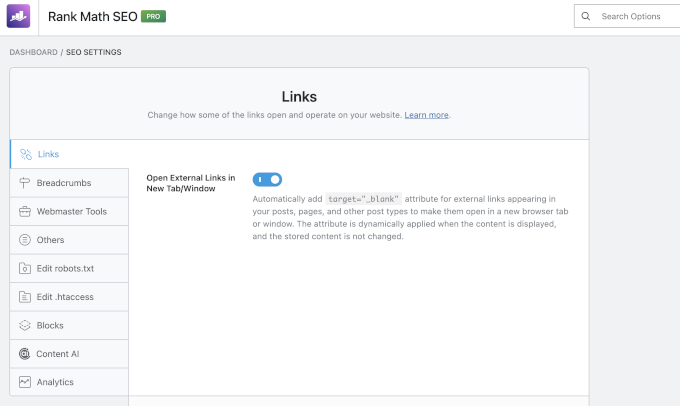
Plus, many users have reported frustration with Rank Math’s intrusive marketing. The dashboard often displays banners for credit upsells, and a “Write with AI” button frequently appears in the content editor.
For professional writers, this can be visual clutter and a distraction. Its interface is often described as overwhelming due to the sheer volume of buttons and settings.
The user interface uses a smaller font and buttons, which makes the design and navigation feel overwhelming at times.
The Winner: AIOSEO
All in One SEO is the superior choice for user experience. It provides a cleaner, faster, and more professional environment.
By focusing on “Decisions, not Options” and maintaining a database architecture that prevents site slowdowns, AIOSEO is an enterprise-grade tool that respects both your time and your website’s performance.
On the other hand, Rank Math feels like a desk covered in post-it notes, advertisements, and gadgets you didn’t ask for. It’s functional but distracting.
Local & eCommerce SEO
Depending on your business, you may need specialized SEO features that are critical for your business.
For instance, retail businesses need local SEO to appear in the search results in their target area and region. Similarly, an eCommerce store needs product optimization to appear in shopping results.
All in One SEO (AIOSEO)
AIOSEO offers a comprehensive, wizard-driven Local SEO module that simplifies complex tasks. Setting up a Google My Business profile is super easy, including Google Maps integration.
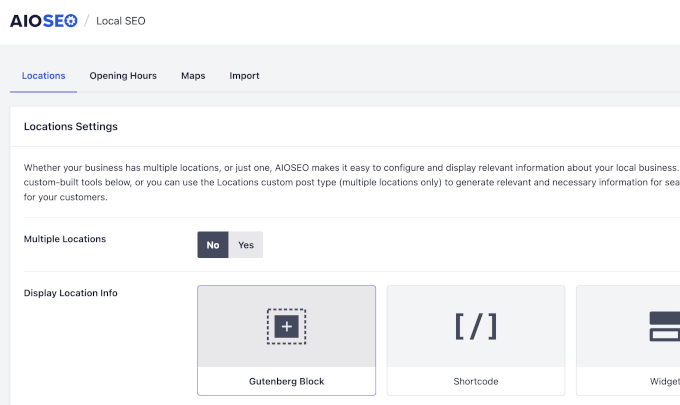
It also includes a functional Store Locator block and an automated Opening Hours Schema that handles holidays and special exceptions. This ensures that Google always knows exactly when your doors are open.
For eCommerce, AIOSEO’s WooCommerce integration is excellent. It automatically populates product schema, such as price and availability, so your listings look professional in search results.
Not using a shopping cart plugin? No worries, you can add a product block to display and sell products anywhere on your site (compatible with popular payment plugins like WP Simple Pay).

Another standout feature is its “expired product” logic in the Redirection Manager. When a product is discontinued, you can set up an automatic redirect to a parent category to avoid a 404 error.
This preserves your hard-earned “link juice” and keeps customers on your site. Additionally, its AI Image Generator lets you turn generic supplier photos into unique visual assets, which helps you avoid “duplicate content” penalties in image search.
Rank Math
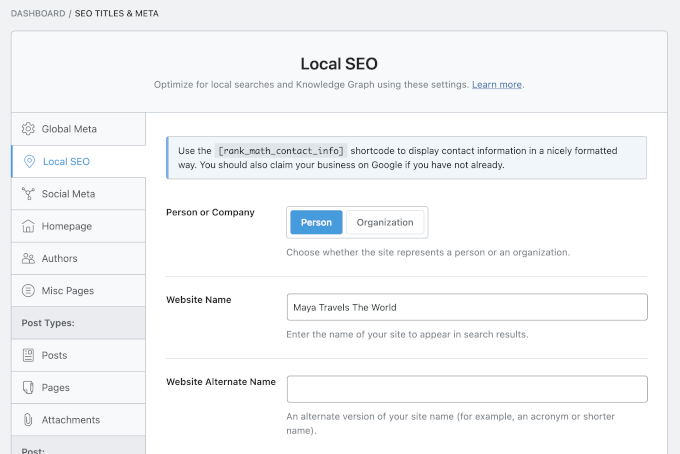
Rank Math provides multi-location support and local business schema, but I found the configuration to be complex and less intuitive for non-technical users.
It lets you set up a Google My Business profile by adding supported data.
While it includes a Schema Generator for products, it lacks the specialized “expired product” redirection logic found in AIOSEO. This means you have to manage discontinued products manually or risk losing search rankings.
The Winner: AIOSEO
All in One SEO is the winner here. Its automated handling of expired products and the ability to generate unique product images with AI give eCommerce sites a massive competitive edge.
Meanwhile, its Local SEO wizard makes “Map Pack” optimization accessible to every business owner.
Security & Access Control (Role Management)
For agencies and growing teams, Security and Access Control are non-negotiable.
Without granular permissions, a junior editor could accidentally “nuke” a site’s global schema or sitemap settings. This can lead to a catastrophic drop in search rankings that could take months to fix.
All in One SEO (AIOSEO)
AIOSEO is often called the “Enterprise Choice” because of its powerful security standards. It provides a Granular Role Manager that lets you let staff optimize meta tags while strictly restricting access to global infrastructure, such as redirects or sitemaps.
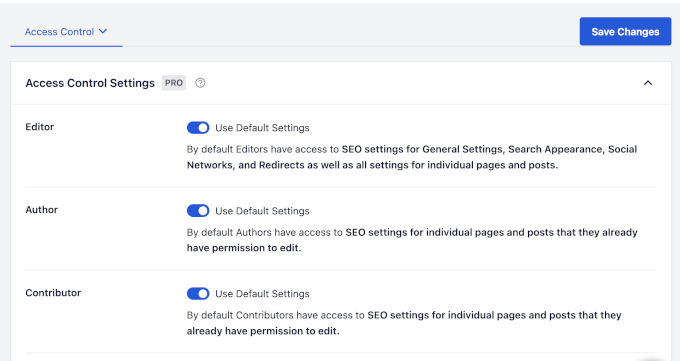
This “Decisions, not Options” philosophy ensures that the interface remains clean and safe for your clients.
I’ve found that this level of control is a lifesaver for agency owners who want to prevent human error.
Rank Math
Rank Math includes a role manager, but it has been reported as less intuitive and occasionally buggy, particularly in WordPress multisite environments.
The user experience is also hurt by “feature creep.” For example, frequent dashboard ads for credit upsells and “Write with AI” buttons appearing directly inside content editor fields create a lot of visual noise.
This cluttered environment increases the risk of accidental configuration errors by less experienced users who might get distracted by the gadgets and ads.
The Winner: AIOSEO
All in One SEO wins for its professional, “clean” environment.
Its focus on stability and restrictive access protects business owners from mistakes. This makes it the safer and more reliable choice for anyone managing a professional team or multiple client sites.
6. Support and Documentation
You want to know that help is there when you need it. I’ve dealt with support teams for both companies.
AIOSEO is part of the Awesome Motive family. They have a massive team that also supports plugins like WPForms and MonsterInsights.
I found their documentation to be written in plain English. It is very easy for a beginner to follow their step-by-step tutorials.
Rank Math also has a great community and a 24/7 forum. I liked their AI support bot, which offered quick answers to common questions.
However, I found their replies can sometimes be a bit technical for a non-coder.
Winner: Tie
Both plugins have excellent documentation and quick support channels to get help.
7. Pricing and Value
The common myth is that Rank Math is cheaper. When I looked at the 2026 pricing, I found the “Agency Tier” story is very different.
| Plan Type | AIOSEO (Annual) | Rank Math (Annual) |
|---|---|---|
| Single Site | ~$49.50 (Best for Business) | ~$69 (Unlimited Personal) |
| Agency Tier | ~$299.50 (Elite – 100 Sites) | ~$599.00 (Full Agency) |
I believe AIOSEO Elite offers the best value for agencies. It includes the AI Keyword Report and advanced client management for a much lower price than Rank Math’s top tier.
AI Credits Pricing
- All in One SEO – Includes generous AI credits with plugin purchase. Users can also buy credits separately, starting from $9.99 for 10,000 credits.
- Rank Math – Content AI subscription starts at $59.04 for a year and includes 7500 AI credits each month.
All in One SEO’s included AI credits are quite enough for most small businesses and blogs. You only need to pay if you have used up all your AI monthly credits and need to replenish them.
Rank Math’s yearly plans don’t have a pay-as-you-go option. You get a set amount of credits each month, and if you have consumed them, you have to upgrade to a higher annual plan.
Winner: All in One SEO
Final Verdict: All in One SEO vs Rank Math – Which One Wins?
Choosing the right SEO plugin is about future-proofing your business. Here is my final verdict.
I recommend All in One SEO (AIOSEO) for business owners and agencies. It is the only WordPress SEO plugin that helps you gain visibility into AI search results.
The Link Assistant and AI Keyword Report provide a massive Return on Investment. It saves you time and shows you data that Rank Math simply doesn’t have.
I recommend Rank Math for hobbyists and smaller blogs or portfolio sites. It is a great tool if you enjoy micro-managing every single technical toggle.
But for now, AIOSEO has captured the high ground. It is the smarter, more stable choice for the AI search era.
Frequently Asked Questions About SEO Plugins
In the rapidly changing world of AI search, you likely have specific concerns about how these tools impact your site’s performance and workflow.
Here are my answers to those questions:
Will I lose my current search rankings if I switch from Rank Math to AIOSEO?
No, switching plugins does not hurt your rankings if done correctly. All in One SEO includes a built-in Setup Wizard that can import all your titles, descriptions, and schema settings from Rank Math in one click. This ensures a seamless transition without losing your SEO progress.
Does AIOSEO’s content analysis work with page builders like Elementor or Divi?
Yes, both plugins have deep integrations with popular page builders. In 2026, you can access the TruSEO score and AI insights directly within the Elementor or Divi editor sidebars, allowing you to optimize your design and content simultaneously.
Do I need to buy my own OpenAI API key to use the AI features?
No, you do not need a separate API key. Both plugins use their own secure connections to provide AI features. AIOSEO includes a generous amount of monthly credits with its plans, whereas Rank Math requires a separate recurring subscription for its Content AI tools.
What is the benefit of the llms-full.txt file found in AIOSEO?
The standard llms.txt is just a list of links, but llms-full.txt provides the actual content of your pages in a clean Markdown format. This is critical because it allows AI agents like ChatGPT and Claude to “ingest” your content much more accurately, increasing your chances of being cited as a source.
Is Rank Math still the best free option for hobbyists?
Rank Math remains a popular choice for users who want a lot of technical toggles for free. However, for business owners who need “Generative Engine Optimization” (GEO) features like AI Keyword tracking, the premium versions of AIOSEO have become the industry standard in 2026.
Can I use both plugins at the same time?
No, you should never run two SEO plugins simultaneously. This causes technical conflicts, slows down your site, and confuses search engine crawlers. It is best to choose one plugin that fits your business goals and stick with it.
Bonus Reading for WordPress SEO
You may also want to take a look at the following helpful resources to grow your business:
If you liked this article, then please subscribe to our YouTube Channel for WordPress video tutorials. You can also find us on Twitter and Facebook.
