I’ve been working with WordPress security for years, and there’s one frustration that persists: the complexity. Most security plugins come with dozens of settings and confusing terminology. Meanwhile, your WordPress website’s threats remain consistent: brute force attacks, file injection attempts, and reconnaissance that reveals too much about your site’s structure. This Iron Security review will examine a plugin that takes a different approach to WordPress protection.
The team at WPIron have built something that prioritizes usability alongside protection. After spending time with this plugin, I’m in a good position to give you a full Iron Security review. My starting point is with the disconnect between what we need and what we get from security plugins.
What Iron Security Is Great At
If you can remember feeling overwhelmed when going through the number of options in your security plugin, Iron Security will appeal. It fills a gap between full functionality and ease of use.

The Mayor asked the development team (WPIron) about which users would benefit from Iron Security. Here’s their answer:
All of them.
I’ve been chuckling at this answer, but in reality, it reflects their goals to create security that works for everyone. After all, there’s hardly a site that doesn’t need security on the modern web.
While I do agree that “all of them” could use Iron Security, I’ve also took some time to think about where the plugin fits in:
- Small business owners who need site protection but don’t have time to become security experts.
- Developers who want hardening without a performance overhead.
- Anywhere consistent security implementation matters more than feature lists.
If you’re looking at your current security solution and don’t like its size or convolution, you’ll like the Iron Security approach of toggle switches. What’s more, if you’ve had to deal with plugins that slow down your site, generate false positives, or require maintenance, Iron Security’s approach will feel different.
Iron Security Review: The Benefits
Unlike security suites that try to handle everything, this plugin concentrates on hardening your WordPress installation against common attack vectors. It’s simple and focused, but I’ll discuss the functionality in more detail soon.
However, the User Experience (UX) does warrant a mention here. Installing Iron Security and configuring its protections takes minutes. Each setting includes an explanation of what it does and why you might want to enable it. There’s no jargon, no assumptions about your knowledge, and no complex settings that hide behind menu structures.
Also, the plugin doesn’t run background scans or add database overhead from my limited use so far. Compatibility seems to be good too – I didn’t have any conflicts or issues with themes and plugins in any case. It’s good to know overall performance is a part of the package alongside your site security.
Iron Security Review: Breaking Down the Key Functionality
Iron Security’s approach to hardening focuses on disabling or securing WordPress features that can become attack vectors. The General tab showcases this well.

For instance, the XML-RPC API has uses but can enable brute force attacks and Distributed Denial of Service (DDoS) amplification. If you don’t need remote publishing or Jetpack connectivity, you could disable this.
I like the nuanced approach of the REST API toggle. Rather than disabling the WordPress REST API (which would break themes and plugins), Iron Security restricts access for non-authenticated users. This maintains functionality while closing off data exposure risks.
There are a few other options here that aren’t individual security measures, but do make your site less of a worthwhile target. Version hiding removes WordPress version information from your site’s HTML source code and other locations where it appears; disabling the file editor prevents attackers who gain access from editing theme and plugin files through the WordPress dashboard.
There’s also a toggle to block AI crawlers, which will be relevant if you work in an industry that needs to control access to your deliverables and assets, such as graphic design. This is a complex implementation that Iron Security handles with a single click.
If you head over to the File and Directory Protection tab, there are two settings that have a single toggle switch each. However, both have big reach on your site’s security:
- By blocking PHP file uploads and other formats, the plugin prevents an attack method where you can upload malicious files through contact forms, media libraries, or other input methods.
- Preventing direct file access will add server-level rules that block attempts to access WordPress files. This includes configuration files, includes directories, and other locations that should never be accessible to web visitors.
It will take you mere seconds to toggle these on, but the protection they give is immense.
Login and Authentication Security
For me, a superb piece of Iron Security’s settings is its custom login URL functionality. By changing your default wp-admin or wp-login.php URLs to something unique, you reduce the number of automated attacks your site faces.
Security through obscurity isn’t something to rely on as a first line defence, but it’s quick to implement and can bolster your provision. You simply specify a ‘slug’ and Iron Security handles the rest. Your login URL will become yoursite.com/your-custom-slug instead of the default.

Login attempt limiting works with the custom URL to provide further protection. You can configure how many failed attempts will trigger a lockout, how long the lockout lasts, and whether repeat offenders will face longer restrictions.
Something else I think is extra-valuable is Admin ID Protection. It addresses a WordPress vulnerability that many users don’t know exists. Under the hood, WordPress assigns user ID 1 to the first Administrator account: attackers know this. Iron Security lets you change this ID to something less predictable and remove information to make a targeted attack harder.
Finally, user enumeration is another novel setting that is worth enabling. It prevents attackers from discovering usernames through WordPress’s author archives and REST API endpoints. This feature works behind the scenes to block ‘reconnaissance’ attempts without affecting your site’s functionality.
The HTTP Security and Headers section arguably contains the settings that you’ll understand the least, but can have a big impact. These all deal with web security standards.

While I can’t give you a complete tutorial on what each option means here, there are some definite standout toggles to make:
- X-Frame-Options. This prevents your site from being embedded in iframes, which stops clickjacking attempts.
- X-XSS-Protection. Toggle this on and you’ll be able to leverage the browser’s built-in Cross-Site Scripting protection.
- Strict-Transport-Security. If a user heads to your site through a HTTP URL, Iron Security will make sure it changes to the more robust HTTPS.
- Content-Security-Policy. This restricts and limits the types of content browsers will load onto your pages.
Also, don’t forgo the Permission-Policy toggle either. This lets you choose which browser functionality your site can use. For example, you could look to block all usage of cameras and microphones if your site doesn’t need that functionality.
Iron Security Review: Setup and Configuration
The installation and activation process is typical, and you can find the dashboard under the Iron Security tab in WordPress.

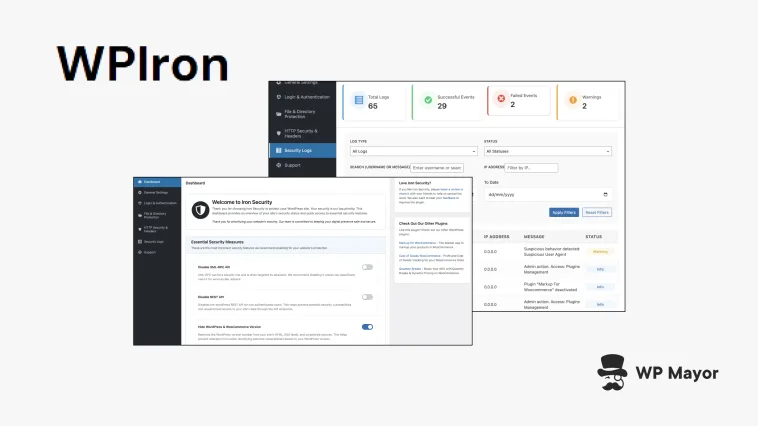
The dashboard provides an overview of your security status. It shows you the most recent logs and a handy set of ‘essential’ measures. I like this, as it makes a straightforward plugin to use even more ‘set and forget’.
As you run through each of the four settings pages, you can toggle functionality on or off. In some cases, you only need to set the switch. Other times, you’ll have fields to complete.
For instance, the Login and Authentication screen lets you set up your custom login URL, configure attempt limits, and adjust session timeouts in one place:

This organization makes finding and adjusting settings a predictable task. In addition, the incremental approach is super simple and lets you test each change before moving to the next.
Finally, I like the security logging as it gives you visibility into activity without overwhelming you with information. The logs show authentication attempts, blocked access attempts, and other security events in a format that’s useful without being technical.
Iron Security Review: Pricing and Value
I had to double check the price of Iron Security at first, because I couldn’t believe it was free. You can grab it from the WordPress Plugin Directory with no premium tiers or upgrades.

The absence of premium tiers means Iron Security gives you the full feature set of the plugin without locking other functionality behind a paywall. If you already pay a premium for your security plugin, you may want to discover whether Iron Security represents good value for you, considering the quality of its offering.
Support and Documentation
Because Iron Security is free, it follows the WordPress.org plugin model and uses the community forums as the help resource. However, you can also find support within the plugin itself…

…and on the main developer website:

However, something I’d like to see more of is documentation. There is none on the website, mainly because the developer is confident in its plugin interface descriptions. While this approach is good for contextual understanding, I think not having site documentation limits the ability for the user to help themselves if necessary.
For example, I haven’t been able to enable options within the HTTP Security and Header section. Regardless of what I toggle on this screen, I get an error message. Online troubleshooting for this would help me.

As such, I’d like to see at least some documentation in place as the plugin matures.
Even so, it’s clear that WPIron is committing to Iron Security over the long term. There’s a roadmap that includes adding malware scanning, malware removal, and WordPress core restoration features, for instance.
These additions would transform Iron Security from a straightforward hardening tool into a fuller security solution. The hope is that it will compete with premium plugins while keeping its usability and free model.
My Final Thoughts: Iron Security’s Place in Your WordPress Security Strategy
Iron Security succeeds in its mission in my opinion – WordPress security without complexity. The plugin delivers protection against common attacks and maintains the accessible simplicity that WordPress is number one for.
There are a few flaws here and there – documentation, some functionality that’s missing – but a free plugin that offers 90 percent of security hardening with minimal setup time? Yes please!
Will Iron Security replace your current WordPress security plugin? I’d love to hear your opinion in the comments section below!